FUNCTION OF THE BRIDGE:
Sets string length at bridge for proper intonation.
Spaces strings at body.
Places strings at playing height off fingerboard.
INDICATION OF PROBLEMS WITH THE BRIDGE:
Instrument won’t stay in tune.
Buzzing of strings on frets.
Strings breaking at bridge.
Poor intonation.
WHAT TO LOOK FOR: Because the hand often rest on the bridge, it is very pron to getting gunked-up from acidy sweat. This can cause adjusting screws to freeze up and plating to wear off. Keep the bridge wiped off to prevent problems. Also look for signs of the bridge leaning or moving. If it seems to be out of place you may want your local repairperson to take a look.
ADJUSTMENTS: Adjusting the OVERALL action of the instrument is done at the bridge. This is done by raising individual saddle pieces or by raising the whole bridge. Study the diagrams that show the different parts of the typical electric guitar bridges. (See Fig. #1) 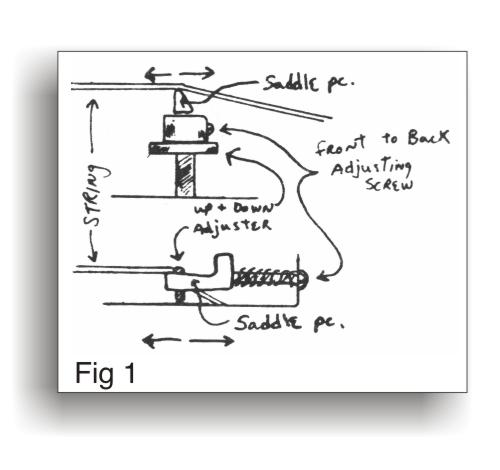
Some electrics have individual saddle pieces that adjust up and down. Some just have adjusters that raise and lower the whole bridge, but not the individual strings, and some have both. This applies to guitars with tremolo bars as well as those without.
In the case of the individual adjusters, do each string individually until the action of that string feels right. (See Fig. #2) 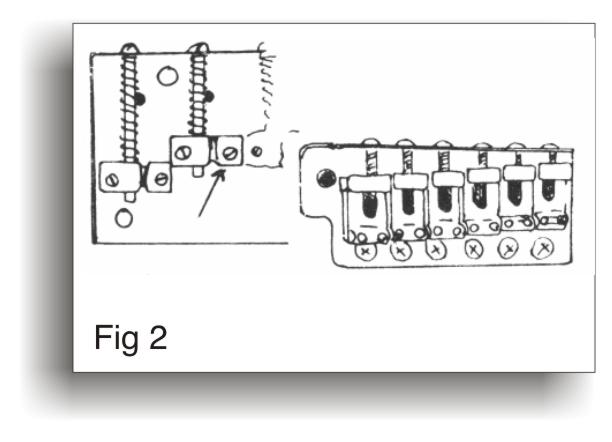
Typically there is a small screw slot or allen screw that adjust the individual saddles. On some models this may vary, particularly on some of the new wang bar assembles. Consult your manual or your local guitar store if there is a question here.
You can leave all the strings on and tuned to pitch when doing this adjustment. As you do each string, be sure to retune and check that string before moving on to the next. If the instrument has the two adjusting screws on each side of the bridge, then turn these up and down to set action.
(See Fig. #3) 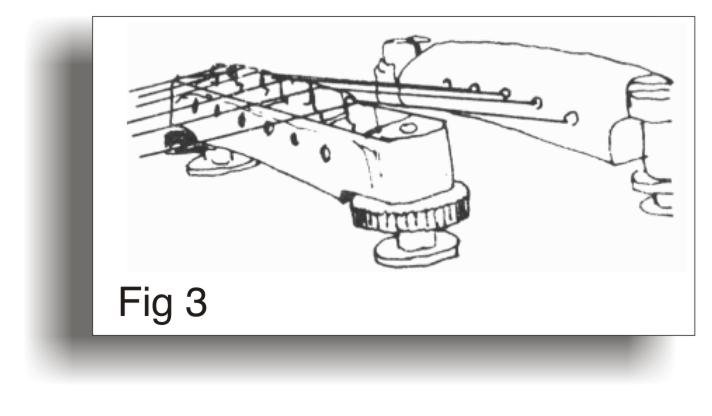
If your bridge has both individual and outside adjusters; first set the individuals to the center of their range. Then roughly adjust the over all action of the guitar with the outside adjusters, then come back to the individuals and make your final adjustments.
REMEMBER: Here we are only adjusting for up and down movement for getting the playability right. We are not adjusting the back and fourth movement which is discussed in the Intonation section.
Keep the individual saddle pieces clean and regularly check them for excessive wear. Left unattended, you will have intonation problems and string breakage. If you keep breaking strings at the saddles, then they may have sharp edges caused by wear. Have your local repairperson look at this for you.
INTONATION:
FUNCTION OF INTONATION:
To keep the strings in tune as they are played up the neck.
INDICATION OF PROBLEMS WITH INTONATION:
Instrument won’t play in tune.
WHAT TO LOOK FOR: The following is for instruments, generally electric guitars, with saddle pieces that are adjustable front to back or guitars like arch tops that have free- moving bridges.
If you shorten a vibrating string exactly in half, you will raise the note of that string one (1) octave. Since the 12th fret is always the one octave point, it follows that the 12th fret must sit exactly under the string at the halfway mark . Then when you play the octave note (the 12th fret note), you have shortened the string by half. Since the frets are not movable, we must change the string length to accommodate the scale length (fret placement on the neck). All strings don’t have the same leingth, because they have different diameters.
ADJUSTMENTS: The following is how to set intonation using an electronic tuner. Later we’ll talk about this proceedure done by ear. First tune the string to standard pitch and read your electronic tuner. Next play the harmonic (or chimed note) at the 12th fret. This is done by lightly touching the string, without pushing it to the fret board, and picking it at the same time, then quickly removing your finger. If your finger is not positioned at the proper place on the string, it will not “chime”. Try moving your finger back and forth a bit around the 12th fret, until you get the chiming sound. Once you have found the chimed note at the 12th fret, that note will be exactly one octave higher than the open note.
I like to read the electronic tuner with this chimed note because it better represents the frequency of the note played at the 12th fret. Now that you’ve seen the octave note chimed on the meter, you must match this octave chimed note to the octave fretted note (the note played at the 12th fret). These two must read the same on the electronic tuning device..
To adjust the saddle pieces in the proper direction to match notes, remember this rule of thumb-”Flat Forward” (forward being towards the headstock.) (See Fig. #1) 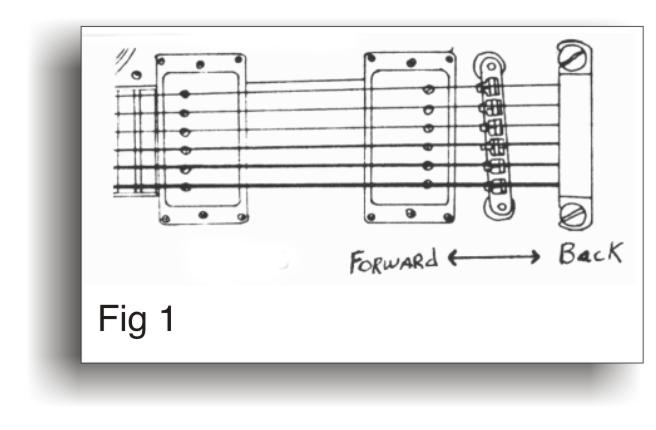
So, if the fretted note is flat (lower in pitch than the chimed note), then you must move the saddle piece forward. If the fretted note is sharp (higher in pitch than the chimed note), then you need to move the saddle piece backwards (away from the headstock). Repeat this procedure for all strings. The way you actually move the saddle piece varies from instrument to instrument. Usually the adjustment is made by turning some type of set screw, like a phillips head or an allen head screw adjustment.
Remember: The fretted note must always match the chimed note. The chimed note can not be wrong. If you want to try and set the intonation by ear, the procedure is basically the same as mentioned above. Instead of watching the meter you listen. When you hear the fretted note sounds the same as the chimed note, you have set your intonation properly.
CAUTIONS: Since the hand often rests on the bridge, sometimes the adjusting screws get “gunk” on them and then don’t want to turn. This “gunk” is from the sweat and acid produced from the skin and after time can corrode metal parts. If these screws don’t want to turn easily, don’t force them. Put a very small drop of penetrating oil on the problem screw and then slowly work it back and forth until it comes loose. If it refuses to budge, take your instrument to your local repairperson