FUNCTION OF THE TREMOLO:
To lower and raise the pitch of the strings, causing a vibrato sound by moving the bar up and down.
INDICATION OF PROBLEMS WITH THE TREMOLO:
Instrument won’t stay in tune.
Spring tension is uncomfortable.
Bar sits in wrong position.
WHAT TO LOOK FOR:
Understanding the basics of how your tremolo bridge or wang bar works, is a must! Let’s take a look at these basics. Because there are so many variations on the tremolo, it is impossible to be specific in a report like this. While of a general nature, what follows should help you in making basic adjustments to keep your tremolo in top working order.
In order to use the tremolo bar and have the instrument stay in tune, the locking systems were created. These units, which are in wide use today, have locking nuts at the headstock and fine tuners on the bridge. It was found that the biggest reason the old tremolos went out of tune was because the strings were hanging up in the nut. When the string tension was released, the string would slide through the nut towards the tuners. When the tension was returned, the strings had a tendency not to come back all the way. This of course caused the guitar to be out of tune.
To stop this from happening, the locking nut was developed. Once the guitar is tuned to pitch, you clamp the strings tight at the nut. This stops any string movement through the nut. The problem now is how to tune the guitar. Even the act of locking the strings pulls them out of tune. So along with the locking nut, came fine tuners on the bridge itself. As you can imagine, all this extra hardware created new problems for the guitarist. While at the outset this may look confusing, take time to understand your tremolo and all the factors involved in its use and adjustment.
Today most tremolos are of the FULCRUM type, while there are many variations, to keep this manageable we’ll concentrate on this, the most common tremolo.
FULCRUM: The fulcrum type wang bars was originally developed by Fender for the Stratocaster guitar in the middle 1950’s. This basic design is still at the heart of a large percent of the systems in use today. (See Fig. #1) 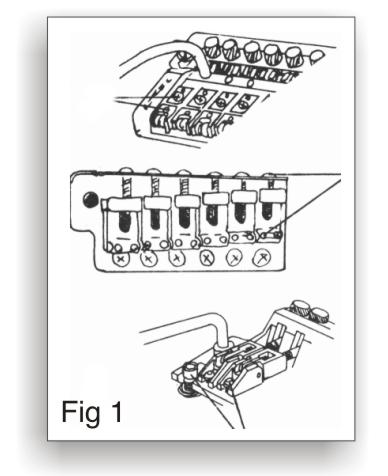 This unit works on the principle of having a knife-edge pivot point on which the bridge rests and a set of springs that return the unit back to pitch. When you push down or pull up on the bar, the bridge is allowed to pivot up and down at these fulcrum points. These points may take many different forms. Older types generally had six screws across the front of the bridge, some have a single blade system on which the bridge moves, and so on. Most common today are units using two studs for the fulcrum points, one on each side of the bridge. (See Fig. #2) Not only are these studs the fulcrum points, but they also serve as screws for adjusting the height of the bridge.(See the section on setting the action at the bridge.)
TREMOLOS:
ADJUSTMENTS:
STRING HEIGHT AND INTONATION:
To make adjustments for string height and intonation, please refer to the sections in this booklet that deal with these problems. The same rules apply to tremolo systems as apply to fixed bridges. You will have to pay close attention to which adjusting screws do which job. Study your guitar to find which screws adjust up and down for string height, and which adjust front to back for intonation. (See Fig. #1 to see some examples of these.)
STRINGS VERSES SPRINGS:
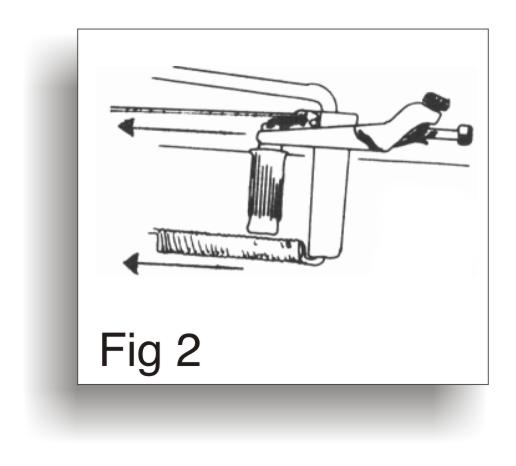
With these bridges resting in their static position, two forces hold them in balance. These two forces are the strings pulling on the top and the springs holding with equal force on the underside. This equilibrium must be maintained at all times. Whenever you change one side of the equation, you must remember to compensate on the other to maintain the desired balance. For every action, there is a reaction. (See Fig. #2)
For example, if you tighten the tension on the springs, you will notice that the strings are no longer at standard pitch. Now when you lower the strings back down to standard pitch, you will notice that the tension on the springs is not quite as heavy as when you adjusted it the first time. Readjust the springs and then the strings and so on until you reach the feel on the bar you want.
With most fulcrum type bars, there are a couple of ways to adjust spring tension. One way is to add or take away springs. If you have a fulcrum tremolo, you will notice a plate (that covers the springs) on the back of the guitar. Remove this plate and you will expose the springs. A typical set up will have three springs, but yours may have more or less. If you wanted your bar to move more freely, you can take away a spring or you can add a spring for a stiffer feel. Remember to retune the guitar. Now check the feel.
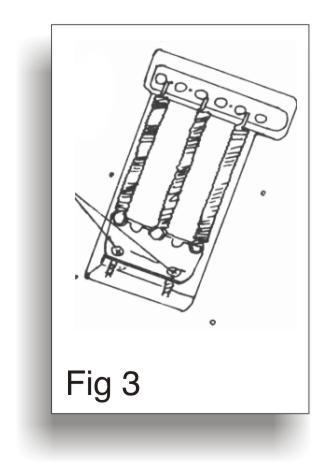
The other way to set the feel is by using the screws that hold the spring hook to the body. (See Fig. #3) By screwing these further in or backing them out of the body, you will pull the attached springs tighter or relax them respectively, thus giving the bar a different feel.
You may need to try a combination of both adding or subtracting springs in conjunction with turning the spring hook screws.
One thing you will notice whenever you adjust your springs is that the position of the bar in relation to the top of the guitar has changed. When you tighten the springs, you will make the bar sit higher off the guitar. Likewise, when you loosen the tension, your bar will sit closer to the surface. This may not be a problem as most units are set up to have the standard feel with the bar at a standard height. But if you like the feel but not the position of the bar, you must remove the bar and physically bend it slightly in the direction you want
A word of caution: Be very careful not to bend the bar so hard and far that you break it!! Most of these bars are made of materials that can stand some bending but be careful!! Avoid using pliers or vises with steel teeth that will mar the finish or damage the threads! You may want your local repairperson to do this for you.
LOCKING NUTS:
Basically, there are two types of locking devices in wide use today. Both seem to work equally well.
One unit replaces the nut and usually clamps the string from the top down.(See Fig. #1) 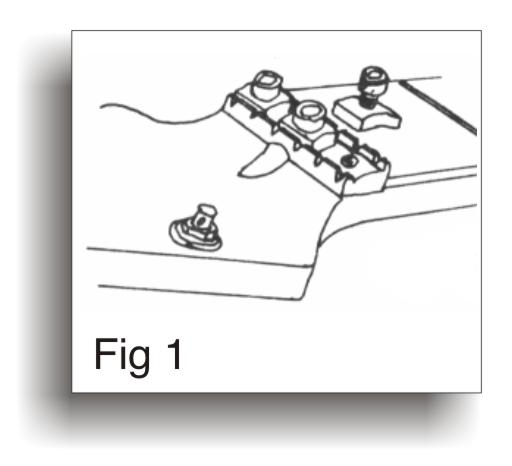 The advantage here is you don’t have a regular nut on the guitar that might cause extra tuning and intonation problems. The locking device is the nut. The disadvantage is in the fact that it is fairly difficult to change the action at the nut (not to mention string spacing). If you have this type locking nut and feel that the action isn’t to your liking, you’ll need to take it to your local repairperson.
The other unit sits behind the existing nut and usually clamps from the bottom up.(See Fig. #2) 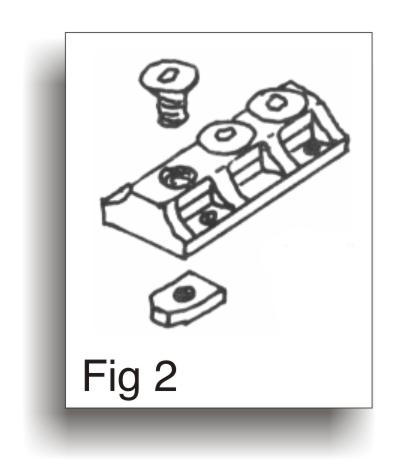
By contrast, its advantages are that since you still have a regular nut on the instrument, you can easily change the action and string spacing, etc. With either unit, never over tighten the locking screws. It is a common problem that after much over- tightening, the allen heads and/or the screw threads will strip out. Also, over-tightening leads to early string breakage. A good snug fit is always best.
If you feel that your strings are slipping through the nut lock and that because of this you need to really bear down on the lock, then take this to you local repairperson and talk to him or her about it. There may be a simple remedy that will save a lot of wear and tear on your system.
Since I’ve talked about locking systems, a word is in order about other approaches. There are some manufacturers who, after working with locking systems, have gotten away from them. They are working along other, simpler lines.
One such developing trend is using nuts that have “rollers”. (See Fig. #3) 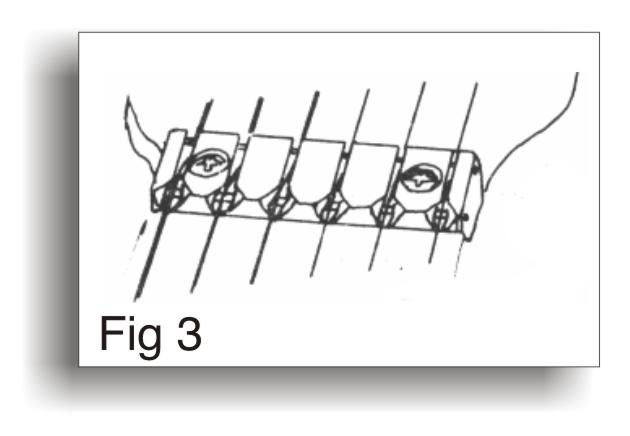 Here the string is free to move back and forth unimpeded. Often these nuts are used in conjunction with tuning heads that have locking devices that hold the string tightly to the tuner. (See Fig. #4)
The idea is that by eliminating any slippage of the string at the tuner (via the locking tuner), and by allowing the string to move completely freely through the nut (via the roller nut), you can do away with more complicated locking systems and still achieve the same results.
If you have an older fulcrum type and wish to upgrade, you might try this approach before you 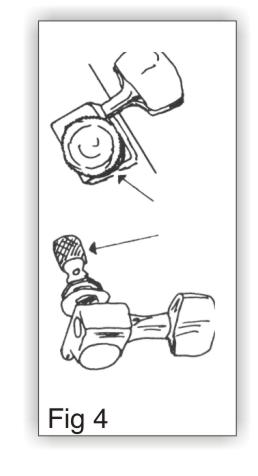 completely replace it with a new locking system. Talk to your local dealer or repair- person for more information about what might work for you.
CAUTIONS: Read the section earlier in this booklet on general maintenance, as this applies to your tremolo as well. There are a couple of things that should be talked about specifically for the wang bar.
Remember to wipe off the bridge after each use with a soft dry cloth. This will greatly increase the dependability of the unit. Be aware that all the moving parts on your tremolo system need to move as freely as possible. For example, if your unit has rollers for the saddle pieces, these need to be free to roll or your strings will get hung up and out of tune. It’s a good idea to apply a tiny drop of 3-in-1 oil once a month to each of the rollers, pivot points, or other regularly moving parts and be sure to wipe off the excess oil.
STRINGS AND WANGS: Tremolos are hard on strings! No doubt about it. So there are a few things to consider concerning strings.
If your strings attach to the tremolo using regular ball ends, buy strings that are made with reinforcing at the windings. Since the plain strings (the high strings) tend to slip at the wrap near the ball end, reinforced strings were developed. These have an extra wrapping of wire around where the string ties to the ball. The wound strings in these sets are the same as in a regular set since these tend not to slip.
With some bars, you have to cut off the ball ends of the strings. If this is the case, DON’T buy reinforced strings. When you cut off the ball, you’ll be cutting off the reinforcing.
Lock and unlock the string at the nut as few times as possible. The more times you clamp down on the string, the more likely it is to break. You should be able to put on a new set of strings and only lock down the nut once. To do this, be sure to put the fine tuners in their middle position. This way you will have plenty of travel up and down for tuning.